If you're not using Windows home edition, you may be able to simply disable this feature using the guide here. If that doesn't work, we have also included some alternative methods below.
1. Download VPN check Pro This has a built in option to stop DNS leak, and comes with a free trial (so that you can see if it works), and only costs $19 if you decide to buy the full version. It also includes a 'kill switch' function that may be useful if you are using P2P Bit Torrent.
2. Change the DNS servers on all of your network interfaces (see our preferred DNS providers below). This will force every network interface to use the DNS that you specify, and will stop DNS leaks.
a) Open Network and Sharing centre (by clicking on the network icon in the bottom toolbar).

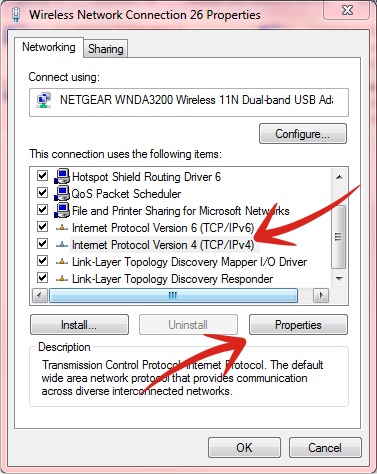
b) Right-click on your main connection & select 'properties'

c) Look through the list and find 'Internet Protocol Version 6 (TCP/IPv6). Untick the box
d) Look through the list and find 'Internet Protocol Version 4 (TCP/IPv4). Highlight it, and click on 'properties'
e) Make a note of any DNS servers that have already been populated, in case you need to change back. Click on 'use the following DNS server addresses' radio button, enter the relevant addresses from the choices below. Click 'OK' and restart the connection.
We suggest using the Open DNS:
e) Make a note of any DNS servers that have already been populated, in case you need to change back. Click on 'use the following DNS server addresses' radio button, enter the relevant addresses from the choices below. Click 'OK' and restart the connection.

We suggest using the Open DNS:
- Preferred DNS server: 208.67.222.222
- Alternate DNS server: 208.67.222.220
or Google
- Preferred DNS server: 8.8.8.8
- Alternate DNS server: 8.8.4.4